
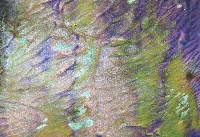
Group: Background Techniques #1 - Acrylic Shimmer
Launch gallery slideshow
| Group: | ATC addicts club |
| Swap Coordinator: | dobie256 (contact) |
| Swap categories: | Art Artist Trading Card (ATC) Painting |
| Number of people in swap: | 6 |
| Location: | International |
| Type: | Type 3: Package or craft |
| Last day to signup/drop: | March 1, 2012 |
| Date items must be sent by: | March 23, 2012 |
| Number of swap partners: | 1 |
| Description: | |
|
This is the first in a series of mixed media techniques for creating your own hand-made background papers for your art projects. I am learning many of these techniques right along with you and I am having fun with them. I hope you do the same! Your final results will be one of a kind artworks that can be left as is or used in collages or other paper projects. Supplies needed: Waxed paper (from grocery store) Acrylic paints (I get mine at JoAnns or Michaels for about $1 each) Cardstock (I used cheap white paper cut to ATC size) Lightweight paper will curl during this technique. You can flatten it out after it dries. Heavy cardstock and cardboards/chipboards curl far less and the glimmer mist doesn't pool at the edges as much. Glimmer mists (there are lots of brands out there now -- easily purchased at art and craft stores -- use whatever brands you like best) Spray sealer or Modge Podge (optional) This is actually a technique I developed through trial and error. I think these background will be fun for collage pieces in particular. I've posted step by step pictures, with descriptions, in my Flickr photostream. Step 1 Pick 2-3 colors that appeal to you. I have tried several combinations and they all have their merits. Adding a metallic color (silver, gold, copper) give your final paper a bit of "pop" Step 2 Finger painting time! You want to cover your ATC sized area but try not to overmix the paints very much. Use a gentle touch! Step 3 Apply the paper to the paint. I usually bend the ends up a bit and let the center of the paper touch the paint first. Then I gently lower the ends. It is very difficult to get total coverage on the paper so consider the background paper you are using. Maybe you even would like some of it to show. Or use that color as part of you set choices so the blank areas look planned. Play with this a bit. I do find the first piece of paper brings up a lot of paint. Applying the second sheet of paper to the first sheet of paper kills two birds with one stone (removes the excess paint while providing paint for a second background). I usually get 3 or 4 backgrounds done before the paint patch becomes too dry or too muddy. Step 4 This is a fun step. The object is to really soak you design with glimmer mists. It tends to draw the paint up a bit and the glimmer settles between the rivulets. Lots of cool potential here. Step 5 Give the mist and minute or two to settle on the paper, then carefull wick the edges (if necessary). When the backgrounds are totally dry you can seal them with the method of your choice (optional -- you can leave them unsealed if you wish) Final Results I usually do 4-5 different combinations while I am being this messy in my workshop. Cleanup is pretty easy -- I use waxed paper so I don't have to keep washing my non-stick sheets. And I definitely use a spray box for the glimmer mists. I have several close-ups on my Flickr Swap Requirements: You will create at least 2 backgrounds for 1 partner (no embellishments, just backgrounds using this technique). These will be ATC sized pieces (2.5" x 3.5") Feel free to send more than two if you get on a roll. Or make a third one and turn it into a completed ATC for your partner. Minimum rating of 4.9, no unexplained 1 or 3s. Please PM me with any questions or concerns, or advice on how I can improve this tutorial! | |
Discussion
Leave a Comment
You must be logged in to leave a comment. Click here to log in.
- Info:
- Home
- |
- About
- |
- Forum Rules
- |
- Terms of Use
- |
- Press
- |
- Advertising
- |
- Blog
- |
- Graphics & Stuff
- Help:
- New User Info
- |
- FAQ
- |
- Group Info
- |
- Glossary
- |
- Forums
- |
- |
- Contact Admin