
TPD: Origami Wreath Ornament
Launch gallery slideshow
| Group: | The Paper Dragon |
| Swap Coordinator: | dobie256 (contact) |
| Swap categories: | Art |
| Number of people in swap: | 5 |
| Location: | International |
| Type: | Type 3: Package or craft |
| Rating requirement: | 4.90 |
| Last day to signup/drop: | November 7, 2012 |
| Date items must be sent by: | November 28, 2012 |
| Number of swap partners: | 1 |
| Description: | |
|
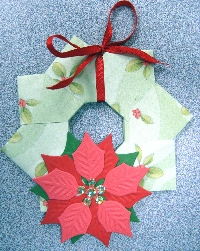
This is a very simple origami wreath decoration that can be used for cards or to hang on a Christmas tree. I have lots of pictures and a tutorial on my Flickr profile or you can follow along with the steps here. Step 1 Choose a piece of 12 x 12" scrapbook paper that has a nice small overall design. Avoid stripes or words (at least until you do a wreath and see how the paper is manipulated). You get two wreaths out of each sheet of paper. You can use a really heavy two sided paper but it will make your folding more difficult. Pick a regular weight scrapbooking paper when possible. Cut your paper into 2" strips, then down into 4" lengths. Fold each in half lengthwise (you need 8 pieces per wreath). Step 2 With the FOLD DOWN (toward you) fold each top corner down even with the folded edge. Step 3 Now fold each piece in half -- points together. Step 4 If you have done everything right so far you should now be able to hold the tips in your left hand, look down on the top of the piece, and see two little pockets. Step 5 Slip the points of the second piece of paper into the pockets on the first piece of paper. Step 6 Keep adding pieces of paper. When you insert the tips gently slide them in as far as they will go and push them slightly "forward". You pieces should line up like in the picture. Step 7 When you get to your eighth and final piece of paper, slip the tips of it back into the pockets of the first piece of paper. Step 8 You will need to tweak the final shape of you wreath. You want to get a nice even octogon in the center of the wreath. You now have an optional step. If I am making a wreath to hang on a tree I like to glue the tips into place so the wreath does not change shape while being handled. Using a GLUE PEN, quickly slide each tip out a small bit, dab a dot of glue on the hidden part of the piece, slip it back in place, and when all eight are done get your octagonal center shape back in place. When the glue dries it will lock the shape into place. You must work quickly to do this and do not try to do this with glue dots -- you will not be able to adjust your shape. Remember, the gluing step is OPTIONAL. If you are using your wreath for a card or package embellishments it is not as necessary to glue it together. Step 9 Finish your wreath. You can add a ribbon hanger as shown in the picture (an ornament hook can then be hooked to this ribbon for hanging). Or you can punch a small hole into one of the wreath tips and thread a riboon through there for hanging. You might want to decorate the wreath itself with stickles or jewels or stickers or die-cuts -- decoration is optional and sender's choice! Helpful Hints Pick a medium weight paper with a small overall design. Take your time and fold carefully and neatly -- that is the main trick to successful origami. A bone folder is helpful but fingernails are probably handier! :) Requirements Please make one wreath for your partner. Make something beautiful for their holiday home and have fun while doing it! Minimum rating 4.9 Final note -- thinking outside the box. This is a neat card decoration. It could be used for a Valentine's card (decorate with hearts), or a birthday card (decorate with candles), or even a Halloween card (turn the wreath into an orange pumpkin?) Anyway this is a fun folding pattern to have in one's artistic arsenal. | |
Discussion
Leave a Comment
You must be logged in to leave a comment. Click here to log in.
- Info:
- Home
- |
- About
- |
- Forum Rules
- |
- Terms of Use
- |
- Press
- |
- Advertising
- |
- Blog
- |
- Graphics & Stuff
- Help:
- New User Info
- |
- FAQ
- |
- Group Info
- |
- Glossary
- |
- Forums
- |
- |
- Contact Admin