
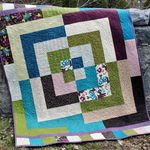
QnT Block Swap – Wacky Tiles #1
Launch gallery slideshow
| Group: | Quilts n' Things |
| Swap Coordinator: | perkl8r (contact) |
| Swap categories: | Sewing Quilting |
| Number of people in swap: | 6 |
| Location: | Regional - USA |
| Type: | Type 3: Package or craft |
| Last day to signup/drop: | December 15, 2017 |
| Date items must be sent by: | January 8, 2018 |
| Number of swap partners: | 3 |
| Description: | |
|
QnT Block Swap – Wacky Tiles #1 12-15-17 thru 1-8-18 --Wacky Tiles (is the name I’m calling this new block) --3 partners --make 2 blocks per instructions below (they will NOT look like the swap picture at this stage) Prep Cutting: 2 different cuts of bright small print fabric to use as center of each block: 4 1/2â€X4 1/2†square For the colored strips cut them into strips 2 ½†wide by the length of fabric (you will need 4 to 8 different brightly colored strips of small print fabric or tone-on-tone) For the white, off-white, or tone-on-tone white strips, cut them in 2½†wide by the length of the fabric (you will need 4 to 8 different whites) Sewing block 1: Start with one of the 4 ½â€X 4 ½†brightly colored center squares pieces. Sew one of the white strips all the way around the center piece. Next sew one of the bright colored strips around the outside of the white and continue rotating white then bright until you have 4 square rings around the center square. Sewing block 2: Start with the second 4 ½†X 4 1/2†brightly colored center piece square. This time start by sewing a different bright color around the outside of the center square then a white strip until you have 4 rings around the second center square (strips will be assembled in reversed order from block 1) --cut each of the 2 blocks into 4 equal and even pieces ---send one piece of each block to each of your 3 partners (each partner will get 2 pieces from you) --keep the remaining two pieces for yourself (one from each block) --when the pieces arrive from your partners you can add them with the 2 pieces you kept and assemble them into 2 completed blocks There are two important things to remember when doing these blocks, sew as accurately as you can a ¼†seam allowance on all seams. Secondly, be very careful when cutting the block into 4 equal pieces. If this swap gets lots of interest we will do it several times to accumulate enough for a project of our choosing. Questions and concerns are welcome, please post a message below. | |
- Info:
- Home
- |
- About
- |
- Forum Rules
- |
- Terms of Use
- |
- Press
- |
- Advertising
- |
- Blog
- |
- Graphics & Stuff
- Help:
- New User Info
- |
- FAQ
- |
- Group Info
- |
- Glossary
- |
- Forums
- |
- |
- Contact Admin