
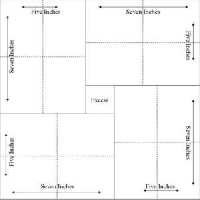
ATC backgrounds from 12 x 12 Cardstock
Launch gallery slideshow
| Swap Coordinator: | dcp0112 (contact) |
| Swap categories: | Art |
| Number of people in swap: | 10 |
| Location: | Regional - USA |
| Type: | Type 3: Package or craft |
| Last day to signup/drop: | November 25, 2019 |
| Date items must be sent by: | December 16, 2019 |
| Number of swap partners: | 2 |
| Description: | |
|
For this swap we will be making ATC backgrounds from a 12 x 12 sturdy cardstock base that we will be doing several techniques on to make a random but beautiful background. If you cut according to the above template then you will get 16 ATC backgrounds per base. You will be sending each of your 2 partners 8 of these backgrounds. I recommend making more than 1 ( I usually make at least 4) so you are lucky enough to get to keep the rest of them for your own use! How fun is that, you don't have to give away your whole masterpiece!! I aplogize for the long description but I want it to be clear and much easier to understand by giving a detailed step by step of the process. Here you have the choice of doing only 1 12 x 12 background and sending all of your 16 ATC's that you cut from it to your partners, 8 to each.... OR, as stated above, you can choose to do 2 or 3 or even more backgrounds since you already have everything out and are making a mess anyway (that is how I think anyway! lol). That way you can do each a little different and have tons of them to keep for yourself. I usually do about 5 backgrounds and use them to send to swap partners as extras and I always get nice comments and thank yous when they receive them in the mail. It is totally up to you but keep in mind that cutting your background according to the template is an exact process so if you make a boo boo it is nice to have the extra backgrounds to fall back on so you don't have to start over. I admit, I am not the best at cutting it exact and sometimes a few of the ATC's end up being a little smaller than standard so I chalk them up to extras and use them for other swaps or art. It is up to you how many you choose to do. Some use thinner cardstock and that is fine but the thicker seems to hold up a lot better under the process. From your sturdy 12 x 12 cardstock you will be getting 16 backgrounds if you cut according to the template. Do not worry, this sounds complicated but it is fun and will create some fun and beautiful backgrounds for your partners. VERY IMPORTANT TO MEASURE AND CUT THIS CORRECTLY. It looks harder than it is but once you get started you will have fun with it. Here it the step by step but it is not a rigid process, this allows for a lot of your own ingenuity and creativeness to come out:) 1) Once you have picked your sturdy 12 x 12 piece of cardstock (can even be a patterned cardstock, white or solid color, your choice) pick some thin washi tape or painters tape and apply randomly over the cardstock in different directions and places over your area, this will leave fun random areas on your base that will look really neat when you remove them. I recommend putting the tape on your shirt or other surface to get most of the sticky out so you won't accidentally rip your base when removing it. 2.) Paint a base color over most of your base (pick a couple colors if you want), you can leave unpainted spots here and there for added design if you want to. Does not need to be perfect. In fact leaving a few little bare spaces is desirable.You can choose the color but I recommend a lighter color of acrylic paint for the base. Let dry, you can remove the tape right after you paint to expose the little areas you have covered. I did this when paint was wet just to ensure that I could get the tape back up, was afraid the paint would make it harder to remove but this is up to you. 3.) Paste/ glue different pieces of book pages or music sheet pages randomly to your base. Just here and there leaving the areas of your paint and base to show through the spaces between. 4.) Pour any color of metallic paint that you think will be a good accent for your base color and use something random in your craft room to create a texture. For example: bubble wrap dipped and stamped on your base, crumpled paper towel or tissue paper, crumpled paper..etc anything that will create a fun pattern on your base 5.) Select a random stamp from your stock (Ex: background text stamp, shape of your choice..etc) and randomly stamp in different areas onto your base...use a color of ink that you think will complement your base color 6.) Next get a small circular shape that you randomly pick from your house, like a baby food jar lid or a lid from a pill bottle and dip it into another color of acrylic that you pick from your selection and randomly stamp it over your masterpiece. This looks funny at first but once you cut your base into ATC size pieces of background the random shape gives it a really neat look 7.) The last layer is your choice of material/ technique. You can use a stencil, spray glitter..etc, whatever appeals to you at the moment. The randomness of this creation is what makes it beautiful. Make sure you are not completely covering any of the layers. Once this is dry you will cut ATC sized backgrounds from your creation, trust me they will be beautiful and unique. You will have 2 partners and they will be sent 8 each of your final 16 backgrounds that you have created..you choose which ones to send. I ended up doing a total of 5 bases so I can have plenty to choose from but how many you make is up to you as long as you have enough to send to your partners. The template can be found on pinterest here. https://www.pinterest.com/pin/28147566391839978/?nic=1 I copied and pasted the image and printed it so I have a reference for cutting Please have fun with it and just enjoy the process. I did s similar swap a year ago, hosted by luv2kraft (she graciously gave me permission to copy her idea), and have used and enjoyed all the backgrounds that I received from my partners. I recently hosted this same swap and everyone loved & wanted to do it again so here we go. It is fun to receive backgrounds from different people and although we all followed the same basic instructions they all turned out so different, each beautiful. Please message me to let me know if you have any questions. Since there are several steps to the project I will give you plenty of time to get it done so no worries just have fun!!! | |
Discussion
Leave a Comment
You must be logged in to leave a comment. Click here to log in.
- Info:
- Home
- |
- About
- |
- Forum Rules
- |
- Terms of Use
- |
- Press
- |
- Advertising
- |
- Blog
- |
- Graphics & Stuff
- Help:
- New User Info
- |
- FAQ
- |
- Group Info
- |
- Glossary
- |
- Forums
- |
- |
- Contact Admin