
THC: 2+ Distress Color Group Fades ~#8 Tag~
Launch gallery slideshow
| Group: | Tim Holtz Challenges |
| Swap Coordinator: | choke (contact) |
| Swap categories: | |
| Number of people in swap: | 3 |
| Location: | Regional - USA |
| Type: | Type 3: Package or craft |
| Last day to signup/drop: | December 6, 2018 |
| Date items must be sent by: | January 7, 2019 |
| Number of swap partners: | 1 |
| Description: | |
|
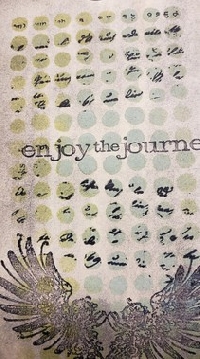
thanks to @splendorpursuit for the great idea to try the color fade with multiple color groups!! (I hope the title isn't too awfully uninteresting :-P) For this swap you will create one #8 (6 1/4" x 3 1/8") tag and send it to one partner. The tag is for decorative purpose only and must include some type of hanger through the top hole. When doing a technique like this, especially on a manila tag, I find the inks lays down better if you start with a light colored stain layer. It is usually quickest with stain but you could use an ink pad and a blending tool as well. Just make sure to dry it completely before starting the fade. Again, this is just a recommendation and not required. You are free to start on any type of blank #8 tag, it does not have be manila. Create at least two color group fades using below steps To create the distress color fade, choose any Tim Holtz large or small stencil from your stash and choose 3 shades of a single color of distress inks or distress oxide inks. One must be a light shade, the 2nd will be a medium shade and the 3rd will be a dark shade. So, you have 3 shades of a single color - right? :-D You're free to include as many shades of the single color as you'd like, but you must have at least 3. Use the blending tool to first apply the light color ink through part of the stencil to your tag, then the medium shade in an area next to that, and finally apply the dark shade right next to the medium shade. The swap picture shows an example of how this works. If I remember right I started with bundled sage oxide on the left, then went to peeled paint oxide and finally to evergreen bough oxide in a very small area. You can apply the fade from left to right, top to bottom, diagonally, right to left, you can fade in and out - whatever you want. You don't even have to apply them in equal areas, so you could make the first color 1/4 of the stencil area, the second color another 1/4 and the dark color the remaining 1/2. You could even go light to medium to dark to medium to light if you want. Am I making any sense? Remember you will create at least 2 color fades for this swap. Good, now that your fades are complete you can finish off your tag in any manner that you wish as long as the fade is still largely visible. Don't forget to lightly decorate the back to match the front and include a hanger through the hole at the top. Write the swap name, your username and the date on the back. Ship to your partner using suitable packaging (e.g. if you've used a lot of chunky or bumpy embellishments you should mail in a thin box or bubble envelope). As always I will angel if you are flaked on provided you have rated your partner a one. | |
Discussion
Leave a Comment
You must be logged in to leave a comment. Click here to log in.
- Info:
- Home
- |
- About
- |
- Forum Rules
- |
- Terms of Use
- |
- Press
- |
- Advertising
- |
- Blog
- |
- Graphics & Stuff
- Help:
- New User Info
- |
- FAQ
- |
- Group Info
- |
- Glossary
- |
- Forums
- |
- |
- Contact Admin