
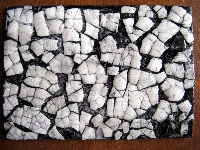
Technique ATC - Eggshell Mosaic
Launch gallery slideshow
| Group: | Paper Cutz |
| Swap Coordinator: | dobie256 (contact) |
| Swap categories: | Crafts Art Artist Trading Card (ATC) |
| Number of people in swap: | 4 |
| Location: | International |
| Type: | Type 3: Package or craft |
| Last day to signup/drop: | March 18, 2011 |
| Date items must be sent by: | April 15, 2011 |
| Number of swap partners: | 2 |
| Description: | |
|
I found this technique while surfing the web and decided to play with it a bit. I liked the results and thought I would post a tutorial swap and share it with you. For this swap you will be making one eggshell mosaic ATC blank for each of two partners (2 ATC blanks in total). The swap is for large shell pattern mosaics (I will be showing you uses for scraps but they are not a required part of this swap). This technique takes several steps/days to complete, so please start on it early so that you do not end up crunched for time. Step 1: Prepare your eggshells. The first time I did this I used hard-boiled shells, but since then I have discovered that uncooked eggshells work too and it is much easier! Either way you want to try to keep the pieces of eggshell as large as possible. And it is essential to remove the eggshell from the membrane. I find this easy to do while the eggs are fresh and "wet". The shell easily peels off of the membrane. I usually hold the shell under a small trickle of running water. You can rub your finger on the inside of the shell and any remaining residue will ball right up. Be sure there is no membrane on your eggshells! The membrane will rot and smell and you must remove it completely. Step 2: Let your eggshell pieces dry for a day or two. They should be totally non-sticky and totally without odor. If there is any odor you can’t use them on your ATC. It means there is still membrane on the pieces. Please start over. Step 3: I laid out my clean dry pieces of eggshell on my work surface. You want them to be curved side UP. I used white coated chipboard for my card base. You can use regular cardstock mounted to a stiff backing. Use a basic white glue to attach the shells. I coated about 1/3 of the card at a time so that the glue stayed wet while I worked. You want an even coating of glue, but not enough to goop up through the shells when you flatten them down. Step 4: Take a piece of eggshell and place it on top of your card. I take the end of a paintbrush and break the shell so that it lies flat to the surface. The larger the piece of shell the less work you have to do. You can fill in tiny spaces with tiny pieces. It is a mosaic so you won’t be covering ever bit of the background (in fact, the final color comes from the spaces between the shells). You can let the pieces of eggshell hang off the edge of your card. It is easy to trim flush once the card has dried. When your entire card is covered LIGHTLY and carefully wipe the surface with a slightly damp sponge to remove any glue residue on the shell surfaces. Let dry at least overnight. Step 5: Trim the edges of your card. Pick the paint color of your choosing. I use inexpensive acrylic paint. Paint on a generous amount, being sure to get down between the shells. Then take a damp sponge and lightly wipe the surface of the card. You want the eggshells to be white, and the color to remain in the cracks. I usually do a quick swipe or two with the sponge, then detail work with damp Q-tips. You can leave some areas with a bit of color, and make some areas perfectly white. That is an artistic choice. Note the couple of pieces of shell on the edge that remained dark – they were put on the card with the curved side DOWN. You can use this to create different areas of color in your card (if you can stand that amount of tedium!) Once again, let the card dry overnight. Step 6: I sealed my card with 2 coats of Modge-Podge (letting them dry overnight between coats). It gives the card great shine and really insures that none of the shell pieces will pop off the card. You could also seal your card with 2-3 coats of a spray sealer (glossy or matte). Just be sure to let dry completely between coats. I can’t stand to throw anything away – especially if I have worked to get it – so I took all the remaining tiny pieces of eggsells remaining and pulverized them. I then glue this eggshell crumble to scraps of white chipboard. I figure they will be great for inchies or ATC embellishments. Once again, sealing them with Modge-Podge or spray sealer insures that all the little pieces stay glued down. These colored samples were colored with glimmer mist before sealing. The white was coated with Modge-Podge that contained some silver glitter. So that is the technique. It is not particularly hard, but it is a bit tedious and time-consuming. I just did a step every day or two while I was in my studio working on other projects. I am allowing a long lead-time and production time for this swap but please be sure that you start early! (This technique would be beautiful on a jewelry box . . . or a barette . . . or a matchbox . . . or as a background for collage ATCs . . . or for inchies . . . ) Swap Requirements: 1 ATC eggshell mosaic blank for each of 2 partners (2 ATC blanks total). Use large eggshell pieces for your mosaic (feel free to include the crumble technique for extras if you wish) Please mount your eggshells on a stiff background so these ATC blanks are ready to use by your partner. Rating requirement of 4.8+, no recent 1 or 3s (within the last 6 months), and then only with explanation. These are ATC blanks for your partners to further embellish as they see fit. You can make your mosaic monochromatic, several shades by using both sides of the shells or not wiping some areas white, or by actually using different colors in different areas of the card Have fun and feel free to PM me with any questions.. | |
Discussion
Leave a Comment
You must be logged in to leave a comment. Click here to log in.
- Info:
- Home
- |
- About
- |
- Forum Rules
- |
- Terms of Use
- |
- Press
- |
- Advertising
- |
- Blog
- |
- Graphics & Stuff
- Help:
- New User Info
- |
- FAQ
- |
- Group Info
- |
- Glossary
- |
- Forums
- |
- |
- Contact Admin