Swap-bot Time: March 29, 2024 1:34 am
www.swap-bot.com

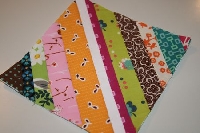
"Sew As You Go" Striped Quilt Block!

Launch gallery slideshow

Group:Nuts for Sewing and Crafting
Swap Coordinator:Mugsie (contact)
Swap categories: Fabric  Sewing  Quilting 
Number of people in swap:15
Location:International
Type:Type 3: Package or craft
Rating requirement:4.98
Last day to signup/drop:January 22, 2016
Date items must be sent by:February 17, 2016
Number of swap partners:1
Description:

It's back!!

Each month (or so) you will use the "sew as you go" method to make your partner 1 striped quilt block ~ 12.5" X 12.5" and the only two requirement is you must use no less than 6 different fabrics. Also NO batting. You will use some plain or leftover cotton fabric you have hanging around.

When you have enough squares to make a quilt, you will add your own batting and whatever you pick for a backing.

Here is the awesome tutorial you will use for this block!

I love Jenny!

In the video she uses backing, batting and then the stripes. In ours we will only use a piece of fabric to sew the stripes to.

You can start right away ~ senders choice in fabric! I have made this International because you can fold your block in 3rds and it fits in a business envelope!

I am SO excited about this swap!!

Please, if you have any questions let me know.

Discussion

Bbnnmomof3 01/ 4/2016 #

Im just wondering will each month be a different block or will they all be the stripes like shown here?

Mugsie 01/ 5/2016 #

They will all be the same like this one. Is there another block you are interested in??

Bbnnmomof3 01/ 6/2016 #

Nope, I was hoping they would all be like this. I've been wanting to do a quilt like this!!

EmilyT 01/ 7/2016 #

I am wondering why we sew the strips to the plain backing fabric rather than just sewing the strips together with no backing fabric?

perkl8r 01/ 7/2016 #

. @EmilyT sewing the fabric to the plain backing keeps the seams straighter and when you are done sewing on all the strips you can flip the block over and if you have already cut your backing fabric the right size you can trim around the edge of it making the front look nice and square. I have been in many swaps for this kind of block and working with a backing fabric makes a world of difference in the look of the final block. Hint: Be sure to press after each strip is added, that really helps too! I have a huge Rubbermaid container full of fabric strips just waiting for more blocks like these.

EmilyT 01/ 8/2016 #

Having the back the correct size to help in trimming sounds like it will help me. There were some block swaps I think I sewed 3 times before sending one because I kept not getting the correct size. Kept the lopsided ones for my own scrappy quilt.

Thanks for the helpful info, @perkl8r

Mugsie 01/ 8/2016 #

Thank you so much @perkl8r

EmilyT 01/14/2016 #

Question girl here again! If I want to make two of these at a time, to keep one for me, should I cut my backing fabric 12.5 x 25, make it, trim it and cut in half or should I just do two separate 12.5x12.5 backings? Thanks in advance!

Mugsie 01/14/2016 #

@EmilyT ~ that is totally up to you. Which ever way is easier for you!

Mugsie 01/14/2016 #

My personal opinion would be to do 2 separate ones!

dally 01/15/2016 #

Silly question. I the pic above the stripes are diagonal, in the video posted they are hours/vert. Can we do them either way? :)

dally 01/15/2016 #

*In *horz. Sorry, on my phone, which insists on autocorrecting everything!

whiskygirl07 01/19/2016 #

That will change the string block and receiver expectation due to project requirements if the strip direction isn't specified. (just saying; from a string block connoisseur)

crochetjunkie 01/19/2016 #

I am also a string block veteran, all of the blocks I have ever made are in the diagonal. You start with the longest "string" that goes down the center from one corner to the opposite. You then add additional strips to both sides of the middle strip. Then you press open. You do this continually until you have covered your entire base square.

My advice is to make your base square an inch larger than size requirements for exact trimming when it is finished. I have tried starting out with my base square the size I need it and it has caused many headaches!!!

Excellent Turorial

crochetjunkie 01/19/2016 #

The main thing I do differently is that I work both sides of the strips instead of one side at a time.

twobluecrows 01/19/2016 #

Do we have to make the strips all straight and even, or can they be kinda wonky and different sized? Most of the ones I have made are a little wonky and thin-medium thin widths (1 1/4" min to 2" maximum width strips--like the one in the swap pic)

EmilyT 01/21/2016 #

Thanks also for the advice of making my backing an inch larger, a wise thing for me to do!

Bbnnmomof3 01/26/2016 #

Thanks Crochet junkie for that tutorial. It was very helpful to me! So, just to clarify, the strings should be diagonal like the picture correct?

twobluecrows 02/13/2016 #

FYI--if you cut your base a couple of inches bigger than your desired finished size, you'll have better luck having the correct measurement at the end. The sewing on of the strips seems to shrink the base just a bit, and it may be too small if you start with a 12.5" base. I usually start with a 14 or 15" base just to be sure it's correct when trimmed--I also like to make my blocks 13" square because sometimes I make 6.5" blocks to put together into a 12" finished block. I've used the trimmings to make tiny scrap blocks later.

Leave a Comment

You must be logged in to leave a comment. Click here to log in.

I received the item
I sent the item

Received from:
For multiple members, separate names with spaces

Description: